Saturday, September 24, 2011

DIY Easy Hair Clip Storage!

Hello again!  For those who don't know, I have a flower making business on the side.  I make fascinators/flower hair clips, and a variety of other hair accessories (I will even shortly be branching out to add feathers and make coordinating rings!).  Either way, it gets to be a little ridiculous, trying to store hundreds of flowers in my little craft room!  I wanted a way to store my flowers, keep them in pristine condition, and be able to easily find them when they sell.  A friend of mine came up with this solution, and I have since run with it, decorating my walls with all of the hair clips!

What you'll need:

A ribbon of your choosing.  I chose a black and white ribbon reminiscent of the old french style.  I like to call it my marie antoinette ribbon!  It is an inch wide, which is just perfect for my flowers.  It also matched my reupholstered sewing table stool, and the memo board I made to match.  You will need to make sure your ribbon is wide enough for the clip to get a grip on, and that you buy enough for the lengths you want.  I bought two spools to start, and have since bought 4 more (though I have them on two walls now).  Also, a hardier ribbon, perhaps of cotton or a blend, is much better than those beautiful sheer ribbons.  Clips will tend to pull on the sheer ones and leave unsightly marks.

Earring hoops.  These can be found at any hobby shop (I use Hobby Lobby), in the jewelry making section.  You can get any shape you like; I personally love the teardrop shape.  You will need to purchase enough for the amount of ribbons you want to make, one per ribbon.

Sewing machine, matching thread, scissors, nails and a hammer.  If you would like, there is minimal sewing, so you can hand sew them.  I personally find it much easier to use my machine.


Now you are ready to start!

Cut the ribbon to your desired lengths.  This is one of the more important parts.  You will want to hold your ribbon up in the spot you would like to hang it, and determine the length you want.  Allow approximately an extra inch on each end, so an extra two inches total.


Place the ribbon through the earring hoop:  sew.  This step takes careful hands!  Simply pull your ribbon through your hoop.  Then, to create a nice, clean edge, fold the very end over on itself, and tuck it against the backside of the ribbon.  Your earring hoop should now be securely through the ribbon.  Simply run this through the machine, a single straight stitch (making sure that you also stitch through the folded under piece).  The only difficulty with this step is getting the folded under portion to stay folded under as you run it through the machine.  I also found that it runs through the machine easier if you turn the hoop to the side while you sew, with the straight edge running parallel to the sewing foot.


Hem the bottom edge.  This is not a necessary step, but I find it makes it just a little nicer.  Simply do the same thing as you did at the top, without the earring hoop.  Just fold the bottom edge in on itself, and fold it over once more.  Run a straight stitch across it, and voila!  You are done!


Hammer the nail in, hang your earring, and you are done!  If you are hanging more than one, I thought it worthwhile to use a level.  Simply use your level against the wall, mark your distances, and hammer the nails in!  I left a four inch space between each of ours, to allow for bigger clips and smaller clips alike, but it is completely up to you!  I also did ribbons of varying lengths, to add a little excitement and draw the eye around the room.  Best of luck!  Let me know how it goes, and feel free to ask any questions you may have!


Yours in Beauty and Love,
Marijke

Saturday, September 17, 2011

DIY Homemade and Personalized Whiteboards!

We all know the benefits of whiteboards:  save the environment, get to easily change/update lists, blah blah blah :-).  But who really wants the traditional, college looking whiteboard in their house?  I sure don't.  However, at best you will find a stainless steel whiteboard.  This is better, but I think the most fun is making your own, personalized whiteboards to match the decor in your house.  This is a surprisingly simple project, that will leave you with all of the benefits of a whiteboard, and the personal touch you want in your home.


Materials Needed:


A frame of your choosing.  When choosing your frame consider the size, and the frame itself.  It does not matter if you buy a frame with any special matting (i.e. a collage frame) or just a cheap simple frame:  what you are looking for is the frame itself and the size you want/need.  I chose a 12x12 frame for our kitchen, as I always have a lot to write there, but simple 5x7 frames for the bedroom night-stands.

Paper or Fabric in the pattern you want.  I have only done this with paper, as I will be demonstrating, but I suppose fabric would work just as well.  It would be a ton of fun if you could find fabrics that either coordinate with your pillows or your bedspread!  I had a huge multipack of scrapbook paper, and just chose some out of there.

Scissors or a paper cutter.

Dismantle your frame.  Simply take the back off, and the papers out.  Clean the glass, and your frame is set.  I told you this would be easy!

Cut your paper/fabric.  The easiest way to do this is to take the stock photo they use, and cut your paper off of that.  Cut it to the same size, and voila!  Two steps down in no time.  Some things to think of:  if there is a specific part of the pattern you wish to highlight, then make sure to place your stock photo over that.  Similarly, if you have a pattern with lines going one way or the other, be careful to cut straight.  A paper cutter is not necessary for this step, however I have one and found it much easier, as I am not gifted with the ability to cut straight lines!


Place your paper/fabric back into your frame.  Last step!  Just place your paper or fabric back into your frame as if it is a photo, put the back on again, and you are done!  Easy breezy!


I hope you enjoy your whiteboard!  Comment a link with your masterpiece :-)!  I would love to see it!  As always, if you have any questions, let me know and I would be happy to help!

Yours in Beauty and Love,
Marijke

Sunday, September 11, 2011

DIY A new twist on Vinyl Wall Art - Framed!!!

It is a great day in the world of crafting!  (Okay, that may be a little TOO hyper for the situation, but I have been so excited to share this next craft with you!)  I saw this project (on a much smaller scale) at a friend's house, and decided I loved it!  Here is the "palette" I was working with:  a very empty wall in an otherwise well-decorated master bedroom! You can probably tell I do not like blank walls...


I am a huge Disney and fairy-tale fan, and so I really wanted something that captured the whimsicality of Disney but was still adult enough to have in a married couple's bedroom.  My husband is certainly not the fan I am, and I wanted to respect that.  There are a multitude of awesome sayings out there that could have gone above the bed, but my favorite (and his) was "Real love stories never have endings".  While I could have just placed the vinyl saying straight on the wall, I decided that I wanted to do something a little more elegant and with a little more depth.  This tutorial will coach you through making a framed vinyl art piece for your wall.

Materials Needed:

1 Vinyl Wall Saying or other vinyl decoration.  Read the size specifications on the box, as this will tell you what size frame you need.  However, you can also tailor that by placing the vinyl on in your own way.  For instance, my carton said that the saying was 11"x26" and I decided to get a frame that was 18"x24".

1 Frame in the size of your choosing.  If you are choosing to go smaller on either dimension, you will want to be very careful, as you will have to do some creative placement with your words to make them fit.  In my case, I simply made the words overlap for effect.  Also, try to make sure the mounting hardware is on the actual frame as opposed to the wood/cardboard backing.  This will prevent you from having to install mounting hardware on your frame, though that is not very difficult.  It just requires that you buy the hardware (Walmart has individual sets for about $0.97), and have a screwdriver at home.

Needle-nose pliers and a hot glue gun.  You do not need the best hot glue gun in the world :-).  My hot glue gun was the cheap one from Walmart, and it has served me well through many projects.  I always suggest the high heat hot glue gun, as I have found it works much better and provides better holding power, but if you like your low heat, feel free to use that.


Heat up your glue gun.

First thing you will need to do is plug in your hot glue gun, so that it can warm up.  I generally keep my hot glue gun in a shoebox, which keeps it from accidentally getting touched by people who do not realize it is on, and means I don't have to worry about the glue seeping out and ruining something while it heats up.  I have found it works great, and I worry a lot less.  


Prepare the frame.

Next step is to remove the packaging from your frame.  Take off all of the cardboard, and remove the back pieces.  Remove any papers inside, and, VERY CAREFULLY, remove your glass.  Set your glass off to the side where it is safe, and other people are safe from it :-).  Take your needle-nose pliers, and, if necessary, remove the tabs that are meant to hold the back in place.  Some frames will not have this.


Clean your glass.

Once you have removed all of the extra stuff from the frame (excepting the mounting hardware), you can set the frame aside and move on to the glass.  First thing you will want to do is to thoroughly clean your glass.  Once you have done that, place your words/art on the glass, and get a feeling for the spacing and set up that you want.  When you are satisfied, follow the manufacturer's instructions to place the words on the glass.  If your frame is shaped weirdly, you will want to be certain that you are putting your artwork on the front side of the glass, the side that would be facing out if the frame were hung as normal.  This is also a good idea to pay attention to even with a rectangular frame, as some manufacturing defects can mean that the glass fits in better one way than the other.


Glue the glass in place.

Depending on the size of your frame, there are two ways to do this.  For a smaller frame (4x6, 5x7, 8x10), you can put a bead of glue around the inside of the frame, just inside the lip, almost straight in that inner corner (not right on the lower lip, but not quite on the side wall), and then place your glass in, with the front side (the side with the vinyl lettering on it) down (so that it will read correctly/face properly when you are looking at the frame).  The reason you do not want to place it on the lower lip is that, once the weight of the glass is placed on top of it, it will seep out and show on your glass.  You want to avoid placing it too far on the side wall, because then it will not even hold your glass in place.  The perfect place is to put it right in the corner between the lip and the side wall.  Also, be very careful about how much glue you are using.  You need enough that there is a small bead, but too much will seep out as well. Once your glass is in and seated well, you can place another bead around the glass, explained below.


For a larger frame, you want to place your glass in first, and then, very carefully, place a bead of glue around the whole edge.  In some spots, your glass may not come near the side wall:  in those cases, use a little more glue to bridge the gap.  If the glass fits really well, you will not need a large amount, but still use enough to hold the glass in place.  The reason you do not put a bead down first is that, by the time you have made it around the whole frame, much of the first glue laid will have solidified, and your glass will not fit in nicely.  (I know from experience!)  Once this glue is dry (for me, it was once I had made it around the frame), you can place a second layer and better fill in any gaps that may have formed as the glue conformed to the frame and glass.


The last step I took (and this is because I had a large frame and was particularly worried about making sure the glass was not moving!), was to reinforce the corners.  I put just a little bit of extra glue and the corners, where I still saw gaps, at all times being careful not to put so much that it would get on the part of the glass that would be seen from the front.


Waiting, Wiping, and Hanging.

Once you are done with the glue, wait for it to dry/harden completely.  Then, clean your frame once more, getting all of the fingerprints and dust off.  Now you are ready to hang your project!  Enjoy!


Yours in Beauty and Love,
Marijke

Monday, September 5, 2011

DIY Wall Art - Fabric Panels

Okay... all showered... now to BLOG!  Excuse my excitement, I have just been so excited, so I had to force myself to stop and join the world of the clean and presentable...

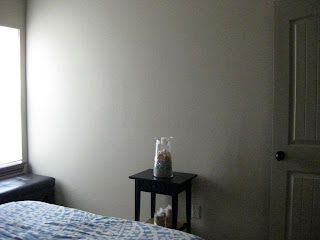
For quite a while I have been looking for the perfect piece of artwork to fill up my very blank wall in my guest bedroom... it was an exercise in futility.  If I found something, it was $300+... or if I found something in my price range, it was either too small, or scuffed and banged up beyond repair (at discount stores, etc.).  Finally, while stumbling my way across the interwebs, I found an adorable idea on Pinterest... The Idea .  I figured, if I shopped the sales correctly, I could get all of the materials for under $100.

So, I waited for Joann's sale on home decor fabric, and went when it was 50% off.  I purchased the other materials on sale at Michael's.

Materials Needed:
Fabric (preferable home decor fabric) in coordinating patterns and colors. I purchased 1 yard for my big frame, and that was enough to cover an additional little frame.  For the others, I purchased amounts based on how much I liked the fabric/how much of it I wanted to showcase.  I purchased between 1/3 yd, 1/2 yd, and 2/3 yard of my fabrics.  I would suggest not purchasing 1/3 yd unless you are doing really small frames... it was a stretch to try and get it to cover a frame as well as I wanted it to.  In general, you will want an excess of six inches each direction out past your frame, which will translate to an excess of 3 inches each side.  EX: If you want to cover an 8x10 frame, you will want a piece of fabric AT LEAST 14x16 (go bigger if you can, it will only make it easier).
  *NOTE:  you can also do it with just one fabric, perhaps a rather patterned one, and it will look AWESOME.  I just have fabric ADD so I wanted quite a few


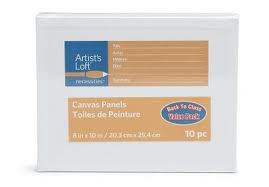
Stretched Canvas squares/frames in the sizes you would like.  I personally wanted a very large wall design, so I have  almost every option... 4x4, 8x10, 9x12, 11x14, 16x20, and 24x36.  You can also do this project by just purchasing the connecting wood frame pieces from Michael's, that artists use to stretch their own canvas, but I am semi-lazy so I decided to just get the canvas covered ones already.  I also felt it would give softer edges when the fabric was stretched over it.  Also, when you are purchasing, pay attention to the width of the canvas... I stuck with all 3/4 inch wide canvas.  I would suggest keeping it uniform, as it lays nice and flat against the wall then, but of course, it is your project!  You don't need to be super precise, just check that they all seem to be about even with each other, no matter the actual size of the frame.  If you are daring, (or don't care, like me!) you can lay your frames out in a pattern on the floor at Michael's, to make sure you have the design you want and enough of each size frame you purchase.  I purchased the Artist's Loft canvas value packs (packs of 2) for most of my frames, from Michael's.


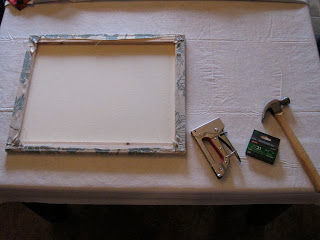
Staple Gun and staples.  I used a staple gun I had purchase at Home Depot (just the cheap, light duty one) for a previous project.  It worked just fine, though I did need to ask my husband to run out for more staples, because I went through two boxes.  He brought home six.  :-)

A hammer.  Because, if you are like me, not all staples will go in properly, therefore you will need to go over them afterwards with a
hammer to ensure they are seated fully.


Placement
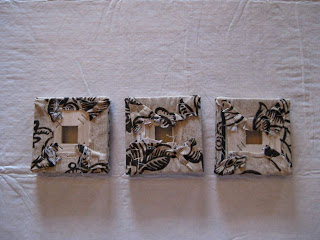
Once you have all of your materials together, you have done the hard part!  Once I was home with all of my materials, I laid my frames out on my living room floor and decided how I wanted them to fit together.  (I actually also did this on the floor at Michael's, to make sure I had enough of each size I wanted to use.)  Then, lay your fabrics on top, just to keep your mind organized, and play around with sizes and colors until you have found a mix you love.


(This picture was post-stapling, sorry!  But don't worry, I had mine laid out and the fabrics just haphazardly thrown on them, for a mental idea.)

Fabric Preparation
Next, iron your fabrics, so that you do not have wrinkles/ugly lines throughout your design.  Once it is ironed to your liking (I despise ironing, so I didn't worry too much when deep set lines wouldn't come out), lay the piece of fabric on a flat surface.  Decide which part of the fabric you would like to highlight (this is more for a really patterned piece:  perhaps you like one flower more than the other, etc.), and place your canvas frame on top.  Cut around the frame, leaving as much excess as you like (I like about three to four inches, for easy holding, but no more than 4 because then it gets in the way for stapling.  It is all personal preference).  Then, if you haven't already, turn your fabric right side (patterned or colored side) down on the table.  Place your canvas right side down on top of it (you should be looking at the back side of both the fabric and the canvas.

Stapling
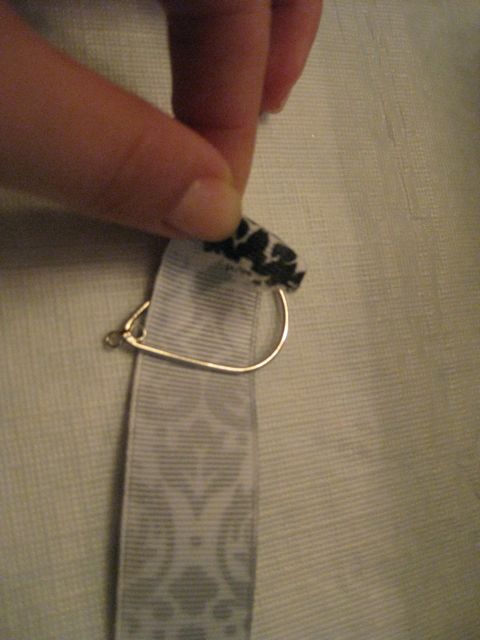
Then... start stapling!  This is much like reupholstering something... you simply make sure your canvas in centered on your fabric, then fold in the edges over to the back side of the canvas square.  Put one staple in the middle of each side, making sure to pull your fabric as taught as you can, or as you like it, before stapling.  Then, starting in the middle and working your way out, place staples approximately 1/2 inch to an inch apart.  Stop before the corners on each side.  I also found, to avoid wrinkling, make sure you are not only pulling the fabric taught towards you, but also away from the center of the frame (meaning pull towards you but also out towards the corners.)
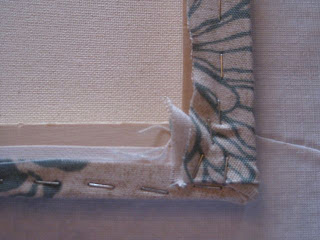

Corners
Once you have stapled all four sides, you only have the corners left.  I did mine my own way, but if you have a way you prefer, of course, do that.  I picked a direction (for me, generally the shorter legs of the frame, or the 8 side of an 8x10) and stapled all the way to the edge on that direction, getting all the way down to within an centimeter from the edge.  I then grabbed the fabric at the corner, on the angle, and stretched that inwards and stapled that (it makes a kind of creased pull over the corner, but shouldn't be too obvious).  I then grabbed the remaining loose fabric (which should now be on the 10 side of the 8x10) and folded it in, much like wrapping a present, with the nice clean line.  I then stapled that in place.  You will end up with a corner that looks nicely wrapped, and will have the wrapping on the same sides around the whole frame (which will look more
uniform in the end.)


It gets a little messier with the smaller 4x4 frames... in that case, I tried to do the same thing, but really just did the best I could with the same method.  Don't forget to smack any loose staples with your hammer!


Hanging your Masterpiece
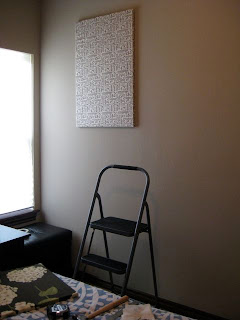
Once you have finished covering all of your canvas frames, it is time to start hanging!  The nice thing about this project is that you don't have to deal with actual picture hanging hardware.  You just need to get your nails level and in the right spot.  My husband took pity on me when he saw me trying to hang a frame almost as tall as I am, so he came and helped for this part.  We started by hanging our corner piece, the biggest frame.  I used two nails for each frame (even the tiniest ones) to give extra stability.  The trick was to find the spot for the first nail, and then level the second nail off of that one.  They don't need to be in any specific spot on the frame:  with two level nails, it is nice because you can move the frame laterally a few inches either way and not have to worry about stability or anything.  It should just slide side to side for easy positioning, and stay level no matter what.

From there, you can either very lightly draw a line with pencil on your wall level from the top of the corner piece, and measure down from that the width you need to hang your next piece (the width of the top piece of wood that will be resting on the nails), or you can just eyeball it and figure out your nail placement for each frame individually.  Just have fun with it!


An hour and a half later (yes, it takes a while when both parties are perfectionists!).... we were putting the last one in!  (Oh, okay, HE was putting in the last one ;-)


Our finished project:


Well, I hope you enjoyed my first ever craft tutorial!  I had a ton of fun doing this project, and hope you do too! If there was anything you have more questions about, or that could be clearer, please let me know!

I would love to see what you come up with!

Yours in Beauty and Love,
Marijke

Welcome! A little About me...

Hello and Welcome!

So, here is the story:  I LOVE to craft.  I wouldn't say I am always good at everything I try, nor am I an expert in anything, but I love what I do.  Since moving away from the beach, I have found that I have a lot more time to spend entertaining myself...  what is a girl to do?  Craft.  My husband bought me a Cricut Expression last Christmas, and that really brought out the inner craft goddess in me: prior to that my crafting had mostly been limited to sewing.

I have not always been a very good seamstress, either.  My grandmother taught me back when I was a teenager, but I never really went very far with it, more just asking her for help on projects and maybe doing a few stitches myself.  However, upon arrival at college, I suddenly realized I was proud of my knowledge, and began making Halloween costumes, pillows for Christmas presents, blankets, and even altering the occasional outfit.  So the sewing gene began to manifest.

Upon leaving college and moving out of state, I decided to bring my sewing machine that I had been given as a gift by my grandparents in high school, with me.  Big decision, as I hadn't really used it very much until then, preferring to use my grandmother's machine when I would go home for Sunday dinners.  Being out of state negated that opportunity, so I was resigned to learning how to use my own.  I began making costumes, a few baby items for my sister in law, and a few things for around the house.  Before I knew it, I was learning all sorts of new tricks and skills on my machine, and people around me were really starting to notice.  That is when I began to take myself seriously.

I gained the courage to actually sew things for my home.  Being the perfectionist I am, I would always prefer to buy something at the store if it will look better than my own handmade items.  The thing is, I began to think my creations were turning out better than I could have bought at the store.  I began to make floor pillows (I LOVE floor pillows) and curtains (I needed something PERFECT for the guest bathroom), and all other manner of little home items.  Fast forward a few months, and my house is full of personalized items that I made, that give my home the one-of-a-kind feel I always wanted it to have.

So that brings me to this blog:  why?  Well, I have started branching out and doing a variety of other projects.  Papercrafting with my Cricut, and without (though, you will more than likely NEVER see scrapbooking on here, I just can't handle it :-), jewelry making, and accessory making.  This last weekend I did a HUGE wall decor project (which will be my next post), and I have a few more in the wings.  Pretty much everything I have done this last year have been things I never thought I would be able to do, but I learned!  Most of my projects are a mixture of my own ideas, mixed with a few instructions I might find online that I mix together to find a method that suits me.

I decided it was high time I share my methods with others.  So many other craft gods and goddesses out there have inspired me, and helped me on my own journey with their wonderful instructions and blogs, I wanted to give back.  On this blog I will feature the crafts I do, and try to give good instructions as to how I do them.  If you find anything you love, feel free to comment, share, etc.  If you have any great ideas, let me know!!!  I absolutely love trying new things!  Thank you for visiting my blog, and God Bless!

Yours in Beauty and Love,
Marijke